Painting on Cookies
This post may contain affiliate links to products I recommend. I receive a small commission at no cost to you if you make a purchase using my link.

Learn everything you need to know about painting on cookies. From what the best edible paint for cookies is and what tools you’ll need, to two basic cookie painting techniques: freehand painting on cookies and tracing a design onto a cookie.

Painting on cookies is a fun way to make beautifully decorated cookies, and believe it or not, you don’t have to be an artist to do it.
In this step-by-step cookie painting tutorial, I’ll show you two easy ways of painting cookies: freehand painting and painting over a traced design.
These cookie painting techniques can be done on either fondant cookies or royal icing cookies, but if you’re new to cookie decorating, then I recommend starting with fondant, as it’s the most forgiving.
We’ll also talk about the different types of edible paint and what they’re suited for, what tools and supplies you’ll need, and the easiest ways to clean up when you’re done painting.
So grab your easel (just kidding, you don’t need one of those) and let’s get started!

Best Edible Paints for Painting Cookies
First, you need to choose a type of edible paint. There are four main types, and they all have pros and cons, so let’s talk about those. But if you want the long story short, I always recommend glaze-based paints as the best and easiest edible paints to work with.
Ready-Made Edible Paint
Glaze-based paint – I prefer to use a glaze-based edible paint, as they dry completely, are smudge-proof once dry and are available in matte and metallic finishes in a wide range of colours and shades. In this tutorial, I used the Sweet Sticks Edible Art Paint, which has since been bought and rebranded as Colour Mill Paint Blend. You can buy the paints from their website and from many cake decorating suppliers. The paints can be used on fondant and royal icing.
Other brands make glaze-based paints, such as Sugarflair and Squires Kitchen, so see what is available where you live.

Confectioner’s glaze (shellac), which is used in glaze-based paints is not vegan, so if you make vegan cookies you should choose a paint that doesn’t contain glaze.
Glaze-based paints also contain alcohol, and while it does evaporate when the paint dries, if you’re making cookies for someone who doesn’t consume alcohol for personal or religious reasons you may wish to choose a water-based paint instead.
Other ready-made edible paints – There are other types of edible paints on the market, but I haven’t tested any of those, so I’m not making recommendations. If you’re choosing a different paint, try to find one that says it is smudge-proof.
Homemade Paint
Gel colour paint – To make paint with gel food colouring, you mix a drop of gel with a few drops of water or vodka. It’s easy to make and convenient if you already have gel colours, but it does not dry completely and tends to remain slightly sticky to the touch. It makes a very shiny paint, and the colours are more likely to bleed together. The moisture in the paint can start to dissolve royal icing, so it should be used sparingly on that. Use a good-quality gel colouring such as Americolor, Chefmaster or Sugarflair.
Powdered colour paint – Powdered colour mixed with alcohol (usually a high % like rose spirit or Everclear, but vodka will also work) makes a nice matte paint, but is prone to smudging. You can also mix the powdered colour with edible glaze, making it smudge-proof and similar to the glaze-based paint I mentioned above. Check out my recipe for edible gold paint, which can also be made with regular powdered colours. This can be used on fondant or royal icing. Make sure you’re buying food-grade, edible powdered colour or lustre dust.
Tools & Supplies

- A paint palette – or other container to put your paint into while you work.
- Cake decorator’s alcohol – (95%), also known as rose spirit, Everclear, dipping solution or food-grade ethanol. This is used to thin the glaze-based paint. I sometimes use isopropyl alcohol to clean my brushes afterwards (more about this below), but you cannot use this to thin down the paint as it isn’t food-safe.
- Pipette – handy for adding drops of alcohol to thin the paint.
- Toothpicks or ice cream sticks – for mixing the paint.
- A small jar or plastic container – to clean your paintbrush in between colours.
- Q-tips/cotton buds – handy for fixing mistakes. I like the ones with a pointy end.
- Paper, a pencil and scissors – if you’re tracing a design onto your cookies.
- And of course, you’ll need your cookies and some fondant or royal icing.
Icing the Cookies
Use a sturdy cookie recipe to ensure your cookies don’t fall apart as you work on them. I used my gluten free sugar cookie recipe, but I can also recommend Sweetapolita’s sugar cookie recipe if you don’t need gluten free.
I prefer to paint on fondant-covered cookies, which is what I’ll be showing you in this tutorial, but the basic technique can also be used on royal-iced cookies. If you’re new, I suggest starting with fondant, as it is easier to work with.
I have a tutorial showing how to cover sugar cookies with fondant that you may want to check out.
For royal iced cookies, I recommend Sweetopia’s royal icing recipe (and she has great tutorials for using it, too).
Cover your cookies with fondant or royal ice them at least 24 hours before you want to paint them, and allow the icing to harden. Exactly how long that will take will depend on the humidity where you live. Firm icing will be less likely to dent as you paint.
For fondant cookies, once you’ve covered your cookies, roll out some leftover fondant and set it aside to dry. Then before you paint, you can use that piece of fondant to practice and test out your paint colours before you start on your cookies.
How to Paint on Cookies
I’m going to cover two basic ways to paint on cookies: freehand painting and tracing a design onto your cookie to paint over.
But first, let’s go through a few of my favourite general cookie painting tips:
General Tips
- Mix the edible paint well before you start painting. For ready-made paint, use a skewer or toothpick to stir it and then give the bottle a good shake to make sure all the pigment that settles at the bottom of the bottle is mixed in.
- If you’re creating a custom paint colour, be sure to mix enough for all of your cookies. It can be tricky to make the same shade again later, so if making multiple cookies with the same design that need to match, make sure you mix up enough paint for all of them.
- It’s best to keep dark colours to a minimum as they can stain people’s teeth when used in large amounts. I prefer to only use black paint for outlining (like I’ll show you on the bunny cookie below) and for small details.
- Sit somewhere comfortable and make sure your arm is well-supported by the table while you paint.
- Don’t be afraid to move the cookie around – instead of twisting your hand to follow lines, or reaching over wet areas of paint, just turn the cookie.
- To fix mistakes when using glaze-based paint on fondant, dip a Q-tip (cotton bud) in alcohol, dab off the excess on a paper towel, and gently rub away the mistake. With water-based paint, you can do the same with a Q-tip dipped in water, but keep in mind that the water will leave the icing slightly shiny (it starts to dissolve the sugar in the icing), so keep this for small mistakes only. For larger mistakes, you may need to remove the icing from the cookie and start over.
- Remember that no one will look as closely at the cookies as you will while painting them. Step back and look at your work from arm’s length; you might see tiny mistakes close up, but no one will see them from further away.
Now let’s put it into practice!
Freehand Painting on Cookies
Freehand painting on cookies with edible paint is pretty much the same as freehand painting anything.
It helps to work in layers, letting the paint dry in between. If you try to paint over thick, wet paint, it will smudge.
Here’s how I did this simple floral design on fondant-covered cookies, using glaze-based paint. This kind of design can also be done with a water-based paint.

Start by using a fine, pointed paintbrush to paint grass along the bottom of the cookie. Touch the tip of the brush to the bottom edge of the cookie and flick upwards in short strokes. Using 2-3 different shades of green gives more dimension.

To make the flowers, draw a long stem, then add dots of purple along the sides at the end. I used three different shades of purple, but if you only have one shade, you can add a bit of white to add some variation.

Add as many flower stems as you want, and add more grass and leaves to fill in any gaps. It’s nice to play around with different paint consistencies and paintbrush shapes to get different leaf and grass textures.

Once you’ve finished painting your cookies, leave them to dry before storing or packaging them. I have tips further down in this post on how to dry the cookies more quickly.
Tracing and Painting Designs on Cookies
Tracing a design on a cookie and painting over it is a great beginner cookie painting technique. It’s also great if you’re creating sets of custom cookie designs, because it makes sure each cookie ends up looking the same.
It’s also my favourite way to write on cookies, because you don’t need to have great handwriting!
You can trace designs onto fondant-covered cookies or royal-iced cookies. Remember to let the fondant or royal icing dry for at least 24 hours before you start to paint – if the icing isn’t hard enough, you will dent it.
To trace the design onto the cookie, you’ll need to use a pencil. Pencil leads are not made of actual lead, they’re made of graphite, which is considered non-toxic and not dangerous in the small amounts used to lightly trace a design onto icing.
However, if you’re not comfortable with that, you can carefully trace it onto slightly soft fondant (not royal icing) to leave a debossed design that you can then paint over. Follow the directions below, but skip the step of pencil tracing the design on the back of the paper, and press slightly harder when tracing the design onto the cookie.
This works best when you paint over the design with darker colours – lighter colours will show the pencil lines through them, and the colour will become muddied.
To trace a design with a pencil, start by printing out your design at a size that will fit on your cookies.

Flip the paper over and hold it up to a window (or bring up a white screen on your phone or tablet and use that) so you can see the design, then trace over the lines with a sharp pencil onto the back side of the paper.
Trace around the design using the cookie cutter you used to cut out the cookie and fondant, and cut out the paper in that shape.

To stop the paper from moving around as you trace, use a few tiny balls of soft fondant to stick the paper on top of the hardened fondant on the cookie.
Flip the paper over, pencil line side down, and press gently on the blobs of fondant to attach the paper.

Using a slightly blunt pencil, trace over the design. Use gentle pressure, enough to transfer the design onto the cookie, but not so much pressure that you tear the paper or dent the fondant too much.

Lift one edge of the paper and check that the design is fully transferred. If it’s not, place it back down and trace again (this only works if the paper doesn’t shift, so be very careful!)
Remove the little blobs of fondant with the edge of a fondant smoother, or rub them off with another little blob of soft fondant. Because the fondant underneath is dry, the little pieces should come off easily.
I like to keep the printed design nearby for reference as I paint.
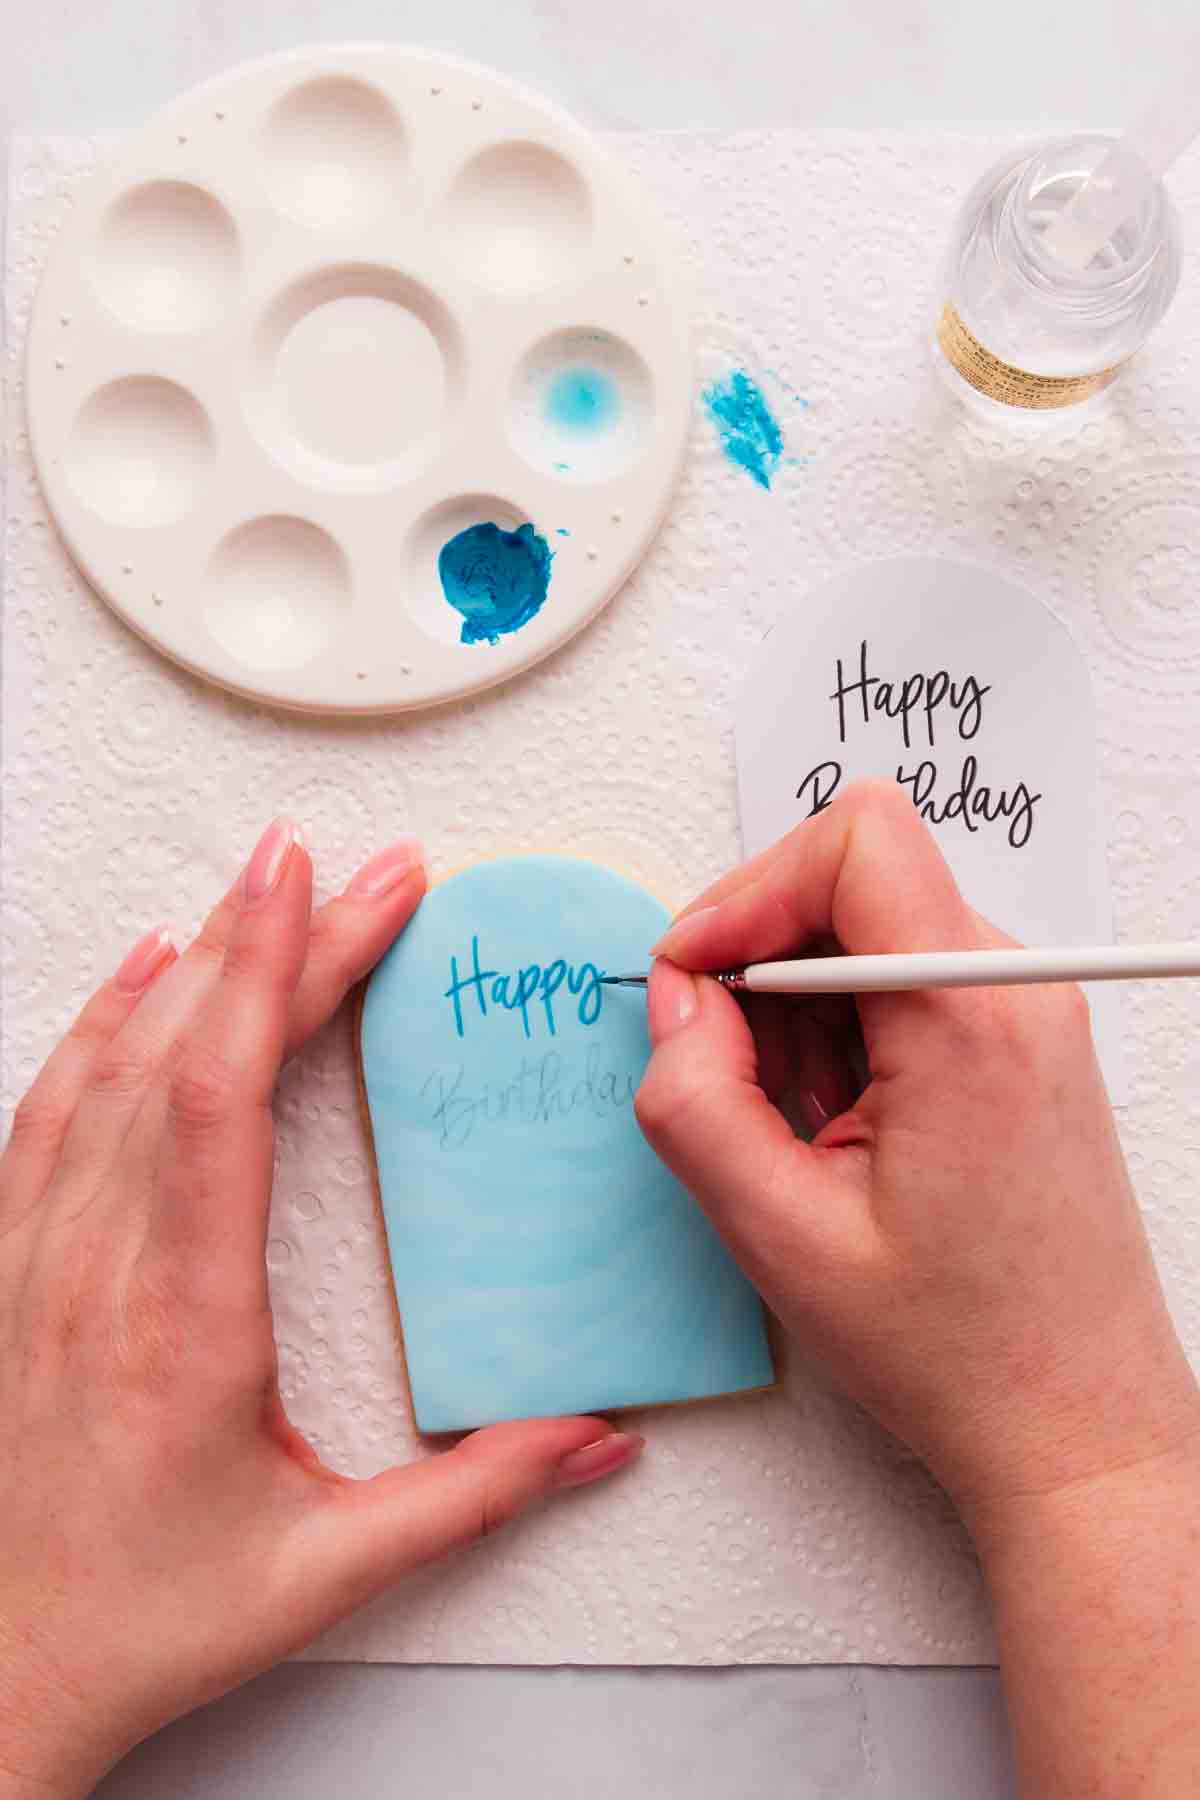
Paint over the lines using your edible paint. Do this in a well-lit area or use a desk lamp to see the traced lines more easily.

Don’t load too much paint onto the brush, or you will end up with blobs of paint. If the paint begins to dry up as you work, add a drop of alcohol to thin it down again.
When painting a design that has multiple colours, paint one colour at a time and let it dry slightly before moving on to the next colour (you can start a production line with multiple cookies; by the time you get back to the first cookie, it should be dry enough to work on).
To see how I finished decorating these hand-painted birthday cookies with a cute under-the-sea theme, head over to my Edible Sand for Cakes and Cookies tutorial.
This technique can be used for picture designs as well as writing. To see it being used for a whole design, check out my cake painting tutorial, which uses the same idea.
Drying the Painted Cookies
Arrange the painted sugar cookies on a baking sheet or tray and leave them to dry. Glaze-based paints dry quickly, but if there are areas with thicker layers of paint, these may take a few hours to dry.
To speed things up, you can use a fan, or if your oven has the option to use the fan with no heat, you can use that setting and place the tray in the oven with the door cracked open slightly. This will circulate the air and help the paint dry faster.
Make sure the paint is completely dry before storing or packaging the cookies.
Clean Up
No one’s favourite part, but proper clean-up will help keep your paintbrushes in good shape for next time.
More Cookie Decorating Ideas
Now that you know all the basics of painting on sugar cookies, you might want to check out these other cookie decorating tutorials next.
Watercolor Cookies
I’ll show you how to create these easy watercolor cookies, plus give you some ideas and inspiration for other watercolor cookie designs.

Stamped Fondant Cookies
See how to make stamped fondant cookies, and how to paint the cookies to make them look even more incredible. They look fancy but they’re SO easy!

How to make edible glue
Learn how to make edible glue at home, and see how I added these cute little pink gumpaste butterflies to the floral cookies I painted in this tutorial.

FAQ
I hope you enjoyed this cookie decorating tutorial!
Don’t forget, I love seeing what you create! Please tag me in your painted cookie pictures or videos on Instagram – @sweetness.and.bite or on Facebook –@sweetnessandbite so I can see 💜
Natalie
xx