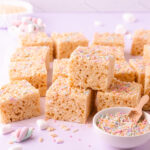
Gluten Free Rice Krispie Treats
These Gluten Free Rice Krispie Treats have that classic combination of crispy rice puffs and chewy, stretchy marshmallows. Find out what ingredients to look out for to make sure they are gluten free, and how to make the best homemade gluten free rice krispie treats!
Servings: 16 pieces
Calories: 248kcal
Ingredients
- 150 g unsalted butter or salted butter
- 1 teaspoon vanilla extract optional
- pinch salt omit if using salted butter
- 425 g marshmallows mini or regular-sized
- 350 g gluten free rice crispy cereal
- 60 g mini marshmallows optional
- oil spray, or melted butter, for greasing
- gluten free sprinkles optional, to decorate
Instructions
- Prepare a 9" square baking pan (or any roughly equivalent sized pan) by lining with baking paper (baking parchment). I like to line the pan with two crisscrossed strips of baking paper (baking parchment), as it makes it easier to lift the rice krispies out later.Lightly spray the paper with oil spray, or brush lightly with melted butter.
- In a very large saucepan, melt the butter over medium heat.
- Stir in the vanilla and salt, then toss in the marshmallows. Continue to stir until the marshmallows are completely melted.
- Remove from the heat and stir in half the rice cereal until well combined, then the mini marshmallows, if using, and the second half of the rice cereal.
- Tip the mixture into the prepared pan, and gently press it into an even layer using an oiled spatula. Don't press it in too firmly, or the rice krispie treats will be too hard.
- Sprinkle with sprinkles, if desired.
- Leave to set for an hour, then remove from the pan and cut into pieces using a sharp knife. For clean cuts, lightly oil the knife.
- Store the rice krispies in an airtight container at room temperature. They are best eaten within 2-3 days.
Video
Notes
Make sure you check that your rice crispy cereal, marshmallows and sprinkles are all gluten free!
Marshmallows - You can use regular sized or mini marshmallows to make these. If you want little pockets of marshmallow, you can toss in the optional mini marshmallows, or chop up some regular sized ones. If you can only get jumbo marshmallows, chop them up with a pair of oiled kitchen scissors so they will melt faster.
Nutrition
Serving: 1piece | Calories: 248kcal | Carbohydrates: 43g | Protein: 2g | Fat: 8g | Saturated Fat: 5g | Polyunsaturated Fat: 0.4g | Monounsaturated Fat: 2g | Trans Fat: 0.3g | Cholesterol: 20mg | Sodium: 141mg | Potassium: 31mg | Fiber: 0.1g | Sugar: 20g
Tried this recipe?Tag @sweetness.and.bite on Instagram, and hashtag #sweetnessandbite so we can see it! ❤
