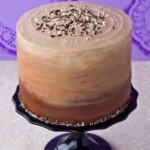
Chocolate & Vanilla Honey Cheesecake Layer Cake
Can't choose between cake or cheesecake? Now you don't have to! Layers of rich chocolate cake with fluffy vanilla honey cheesecake and light Italian meringue buttercream - this cake is a real showstopper!
Ingredients
For the chocolate cake layers:
- 150 g dark chocolate at least 50% cocoa solids
- 2 teaspoons instant coffee optional
- 265 ml boiling water
- 425 g gluten free flour blend or all purpose wheat flour - see notes
- 1 ½ teaspoons Xanthan gum omit if not making gluten free
- 25 g cocoa
- 2 ½ teaspoons baking soda
- 50 g ground almonds
- 265 g butter at room temperature
- 425 g brown sugar
- 2 teaspoons vanilla extract
- 5 eggs at room temperature
- 265 g sour cream
For the vanilla honey cheesecake layers:
- 500 g cream cheese at room temperature
- 200 g mascarpone use another 200g cream cheese if you don’t have/can’t get mascarpone
- 1 ½ teaspoons vanilla bean paste
- 150 g caster/superfine sugar
- 4 tablespoons honey I used squeezy honey
- 2 large eggs at room temperature
- 3 tablespoons cornflour/cornstarch
- 120 ml whipping cream
- Vanilla Italian meringue buttercream {Click for recipe}
- 250 g chocolate at least 50% cocoa solids, melted and cooled.
Instructions
Make the cake layers
- Preheat the oven to 180° C. Line the base and sides of two 7” round cake tins with baking paper, leaving a high ‘collar’ of baking paper above the edge of the tins.
- Roughly chop the chocolate and place it in a heatproof jug with the coffee (if using) and then pour over the boiling water and stir to melt the chocolate. Set aside to cool. Sift together the flour, Xanthan gum, cocoa and baking soda. Add the ground almonds and whisk to combine thoroughly.
- In the bowl of an electric mixer fitted with the paddle attachment, beat together the butter, sugar and vanilla extract until very light and fluffy. Gradually add the eggs, beating well between each addition. Turn the mixer down to low speed, and add the chocolate mixture and flour alternately, beating well between each addition.
- Scrape down the sides of the bowl, and then add the sour cream, mixing on low speed until just combined. Remove the bowl from the mixer and give the batter a last stir by hand, scraping down to the bottom of the bowl to ensure it’s all thoroughly mixed.
- Divide the cake batter between the tins, with more batter in one tin than the other. {See notes below on how to divide the batter}
- Place a piece of foil over each cake (it should rest on top of the collar of baking paper) and then bake in the preheated oven for 45 minutes – 1 hour, or until they spring back when pressed, and/or a skewer inserted into the middle of the cake comes out clean. Leave the cake in their tins to cool, then fold down the baking paper, cover the top of the tin with foil and leave overnight to cool completely (this makes the cakes easier to handle).
Make the cheesecake layers
- Line the bottom and sides of two 8”(20cm) springform cake pans with baking paper. Wrap the outsides of the pans with foil, you’re going to bake the cheesecakes in a bain marie, and you don’t want the water getting into the pans.
- Preheat the oven to 130°C. Get ready two baking dishes (or one large baking dish) big enough to fit the cake pans.
- Put the cream cheese, mascarpone and vanilla paste in the bowl of an electric mixer, and beat on medium speed until smooth and creamy. Scrape down the bowl and then add the sugar and honey, and beat again on medium speed until the sugar has mostly dissolved.
- Lightly whisk the eggs together and add them gradually to the cream cheese mix, beating on low speed until combined between each addition of egg. Scrape down the bowl and mix again.
- Sift the cornflour into the bowl, and mix until incorporated. Mix in the cream on low speed. Scrape down the bowl and mix again.
- Divide the mixture evenly between the two cake pans. Place the cake pans into the baking dishes, and put them in the oven. If your oven isn’t big enough to fit both cheesecakes at the same time, bake them one at a time. Pour boiling water into the baking dishes, up to the level of the cheesecake mixture.
- Bake for 20 minutes, or until the edges of the cheesecakes are set, but the middles are still a little wobbly. Leave to cool, and then place in the fridge until firm. When you’re ready to put the cake together, place the cheesecakes in the freezer while you get everything else ready.
Putting it all together
- If you haven’t already, make your vanilla Italian meringue buttercream (or use your favourite buttercream recipe).
- Remove the cheesecake layers from their tins (still on the baking paper). Make a baking paper template (I drew around a 7” cake card, cutting the template slightly smaller than 7”). Use the template to cut out the cheesecake without cutting through the paper underneath. Leave the circle of cheesecake on the paper, and remove the excess cheesecake from around the edges. I found it easiest to do this with a metal spatula. Place both cheesecakes in the freezer.
- Use a large serrated knife or cake leveller to remove the domes from the tops of the cakes. Split the taller cake into three layers, and the shorter cake into two layers, so you have 5 layers of cake in total. If your cakes are soft and hard to work with, place them in the freezer for 10-15 minutes to firm them up.
- Spread a dab of buttercream onto a 7” cake card (or straight onto your plate or cake stand, if you prefer) and place a layer of cake on top. Spread the cake with a thin layer of the vanilla buttercream and top it with another layer of cake. Take one cheesecake layer from the freezer and smear a bit of buttercream on top. Flip the cheesecake over onto the cake and peel away the paper. Dab with more buttercream and place another cake layer on top. Repeat steps with the next layer of cheesecake, then cake, then a layer of buttercream and the final layer of cake.
- Lightly crumb-coat the cake with buttercream then pop it in the fridge. While the cake chills, divide the remaining buttercream between three bowls. Add melted chocolate to them, starting with a small amount in the first bowl, then a little more in the second, and more in the third so you have three different shades.
- Cover the top of the cake with the lightest buttercream and smooth. Roughly and thickly spread the darkest buttercream around the bottom of the cake. Repeat with the middle shade, around the middle of the cake. Use a spatula or scraper to smooth all three colours together. {See Sweetapolita's tutorial video on how to do this}.
- If transferring the cake on a cake card to a stand or plate, chill the cake until the buttercream is firm before transferring. Sprinkle the top and the bottom edge with sprinkles if desired. To place sprinkles around the bottom, I poured the sprinkles onto the stand around the cake, and then used a clean paintbrush to press the sprinkles against the cake.
- Best served the day it is made, but can be stored in the refrigerator for up to two days. Remove from the fridge half an hour or so before serving to let the buttercream soften.
Notes
I know it seems like a really long recipe, but none of the steps are terribly hard, and trust me, it's all worth it!
Gluten free flour: I use my favourite gluten free flour blend for baking.
If you don't need the cake to be gluten free, simply use regular plain wheat flour and omit the Xanthan gum.
Dividing the batter:
You want to get two layers out of one cake and three layers from the other, so you need to put approximately 2/5 of the batter in one tin and 3/5 in the other. Easiest way to do this? Put one tin on your scales and pour in roughly 850g of batter in that tin, and the rest in the other tin. (it should be about 1.27kg in the second tin, if you’re interested.) Sound too pedantic for you? If so, and you’re not worried about how even your layers are, then by all means just guess 2/5 and 3/5 when you’re putting the mix in your tins.
Tried this recipe?Tag @sweetness.and.bite on Instagram, and hashtag #sweetnessandbite so we can see it! ❤