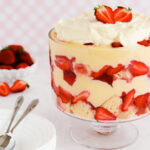
Gluten Free Trifle
Learn how to make The Best gluten free trifle! Either make it completely from scratch with this homemade gluten free sponge cake and homemade custard, strawberries and jelly, or substitute store-bought components for a quick and easy dessert.
Servings: 12 serves
Ingredients
For the gluten free sponge cake*
- 5 whole eggs
- 1 egg yolk
- 200 g caster sugar
- 200 g gluten free flour blend
- ¼ teaspoon xanthan gum omit if you use a gf flour blend that contains a gum ingredient
- 2 teaspoons vanilla extract or vanilla paste
- 1 Tablespoon gf flour + 1 Tablespoon caster sugar extra for preparing cake pans
- OR use 1 large store-bought gluten free sponge cake
For the custard
- 6 egg yolks
- 2 whole eggs
- 750 ml milk (3 cups)
- 250 ml 1 cup whipping cream (1 cup)
- 200 g sugar
- 65 g cornflour (cornstarch)
- 2 teaspoons vanilla extract or vanilla paste
- OR use 1 - 1.5L of ready-made custard
For the jelly
- 1 packet strawberry jelly crystals
For the macerated strawberries
- 750 g fresh strawberries
- 3-4 tablespoons icing sugar depending on sweetness of berries
- 1-2 teaspoons vanilla extract or paste
To assemble
- 500 ml whipping cream (2 cups)
Instructions
- Please see the notes below to see what components you can make in advance. My own preferred preparation timeline is to make the sponge, custard and jelly the day before assembly. Prepare the strawberries 1-2 hours before, then put it all together and serve it later the same day, or the following day.
Make the Sponge Cake:
- Heat oven to 180°C.
- Prepare the cake pans: Spray two 20cm (8") round cake pans with cooking oil spray, or brush with melted butter). Line the bottoms with a circle of non-stick baking paper.Combine the 1 tablespoon of gluten free flour and 1 tablespoon of caster sugar in a small bowl. Pour it into the first cake pan, and swirl it around to coat the sides of the pan. Tip it out into the second pan, and repeat. Tip out and discard any remaining flour/sugar mixture, and bang each pan upside down over the sink to remove any excess.
- Sift together the gluten free flour and xanthan gum, and whisk to combine well.
- Bring 1" of water to a simmer in a saucepan that is just big enough to sit the bowl of a stand mixer, (or a large heatproof bowl, if using a handheld electric mixer) on top, ensuring that the bottom of the bowl doesn't touch the water.Place the whole eggs, egg yolk, caster sugar and vanilla into the bowl, and place the bowl over the water. Stir constantly until the egg mixture is warm and the sugar is mostly dissolved (it should be around 40°C if you have a candy thermometer). If you prefer to skip this step, make sure your eggs are warm before you start, by placing the eggs (in their shells) into a bowl of hot tap water for 10-15 minutes. Then crack them into the mixer bowl, add the sugar and vanilla, and continue with the next step.
- Once the eggs are warm, whip them until they are thick and pale and make a thick ribbon when you lift the beaters. This takes about 10 minutes at medium-high speed in a stand mixer, but may take a little longer with an electric hand-held beater.
- Gently fold in the sifted dry ingredients in three-four additions. I like to use a large wire whisk to do this, as it doesn't pop as many of the air bubbles. A large metal spoon or silicone spatula will also do the trick.
- Divide the batter evenly between the two prepared pans and then give them a tap on the benchtop to pop any large air bubbles.
- Bake for 25-30 minutes, or until they're lightly golden and pulling away from the sides of the pan.
- Allow to cool for 30 minutes in the pans, then slide a spatula around the edges to loosen them, and tip the sponges out and place right-side-up on a wire rack to finish cooling. Wrap with plastic wrap and store in an airtight container at room temperature for 1-2 days, or in the freezer for a month or two.
Make the Custard:
- Combine the milk, cream and roughly half (don't worry about measuring, just guess half-ish) of the sugar in a large saucepan. Stir well, then heat until just starting to boil.
- Whisk together the egg yolks, whole eggs, the remaining half of the sugar and the sifted cornflour in a large heatproof bowl until smooth and creamy.
- When the milk mixture is ready, pour it into the egg mixture a small amount at a time, stirring in between additions.
- Return the custard to the saucepan, and return it to medium-high heat. Stir constantly, making sure to scrape along the bottom of the pan, until the mixture begins to boil. It will start to thicken quickly. Reduce the heat and continue to cook for another 1-2 minutes, or until it has no starchy flavour when you taste it (take it off the heat while you test it, and be careful not to burn your tongue!)
- When it's done, pour it into another large bowl (or wash out the first bowl and use that) and whisk in the vanilla. Cover by placing plastic wrap directly on the surface of the custard (this will prevent a film from forming on the surface).
- To cool it faster, place the bowl into a sink of cold water, with the water coming 1/2 to 3/4 of the way up the side of the bowl (add ice to the water if you have it). Once the custard is no longer hot, you can put it into the fridge.
Make the Jelly:
- Make the jelly according to the packet instructions. Pour into a small dish or cake pan that has been lightly greased with an unflavoured vegetable oil or cooking oil spray. Chill until set.
Prepare the Strawberries:
- Wash and drain the strawberries, then hull and chop them into chunks or slices (I like to do a combination of both). Leave out a few whole strawberries to decorate the trifle later, if you like.
- Combine the strawberries with the icing sugar and vanilla in a bowl. Cover and refrigerate for 1-2 hours.
To Assemble the Trifle
- Whip half (250ml) of the whipping cream just until soft peaks form. Fold the cream into the custard to lighten it (you can still do this with store-bought custard, if you like, or skip it).
- Cut the sponge cake into cubes. Start with one cake, you may not need the second one, depending on the size of your bowl and how thick you make your trifle layers.
- Slice the jelly into cubes.
- Begin layering the trifle into your bowl. I did a layer of sponge, then around 1/3 of the strawberries (drizzle some of the strawberry liquid from the bottom of the bowl over the sponge, if you want) then half the custard, the jelly cubes, then more sponge, strawberries and the remaining custard. Spoon the remaining strawberries on top. At this stage, you can cover the trifle with plastic wrap, and refrigerate until ready to serve.
- Just before serving, whip the remaining 250ml of cream, swirl it on top of the trifle, and decorate with extra strawberries if you like.
- Any leftover trifle will keep in the fridge for 2-3 days (if you don't eat it all for breakfast... no? Just me?). Make sure it's covered well, or transferred to an airtight container.
Notes
*Sponge - The sponge recipe makes two 8" cakes, you may not need both depending on the size of your bowl. The remaining sponge can be frozen for use at a later date.
Bowl Size
I made this trifle in a 3L capacity trifle bowl, which is quite large. If you only have smaller bowls, you may want to make it in two bowls, or you can halve the custard and fruit recipes. I don't recommend halving the sponge cake recipe, it's easier to make a larger sponge than a smaller one. You will likely have cake left over, so you can freeze it for your next trifle, or eat it with any leftover cream or custard.Shortcuts:
Instead of making the components, you can use a store-bought gluten free cake or boxed cake mix, and 1 - 1.5L of thick custard (check that it is gluten free).Make in Advance:
The sponge cake can be made 1-2 days in advance, or up to a month beforehand and frozen. The custard can be made the day before assembly. Jelly can be made 2-3 days before.Fruit layer alternatives:
- Any combination of fresh berries, rinsed and dried, or fresh tropical or stone fruits, rinsed, peeled and chopped into bite-sized pieces.
- Any kind of tinned/canned fruit in syrup or juice - peaches or fruit salad are popular choices. Drain the liquid from the fruit, you can also save the liquid to drizzle onto the sponge layers.
- Frozen fruit: Thaw and drain before using. Again, you can reserve the liquid to drizzle onto the sponge.
Tried this recipe?Tag @sweetness.and.bite on Instagram, and hashtag #sweetnessandbite so we can see it! ❤